

Post “Konmari-ing”
They say that your home never stops with the renovations, and it could not be more true. My wife and I believe that a home should change with you – as your style changes, so should your home. From interior decorations, lifestyle choices, travels or every day uses, your home should reflect who you are now, not who you were when you first bought it! If you keep your house up with the times, not only will you feel and stay relevant, but your resale of your home will also actually reflect the value you know your home to be.
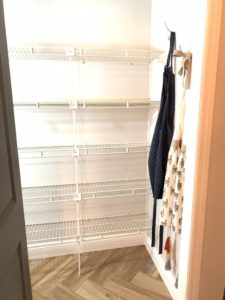
With that in mind, we decided over the small winter break to update / redo our pantry. The shelving system, here when we bought the foreclosed home, was FULL of caked on grease, grime and unidentifieds. It always grossed us out to think that this is where our food was going – on top of who knows what! So, no time like the present!
Follow along our journey as I add to this post each day of what we did to renovate our pantry! #prettypantry #intentional2019
Day 0 – The Before
So before we started anything, we “konmari-ed” our pantry. #mykonmari Voted as one of 2018’s 100 most influential people of our time, Marie Kondo invites you to seek out only those items that “spark joy” in your life to retain. So, looking over all the contents of our pantry, we decided to cleanse our pantry of unused items, old food, or organizational systems that didn’t spark our joy anymore. Marie Kondo actually suggests doing this for every facet of your life – having already done our clothes closet, and loving it, we knew that before we could do any renovations, we had to start here. So, we cleaned it out. You can read more about her TIME feature here –> TIME Post
Day 1 – It Begins
Remove all items
Remember, we are still on our break, so we didn’t want to do too much at one time – I mean, it’s still our break! So, we decided to plan it out to do a little each day. One the first day, we figured out all our tasks per day and set them into execution.
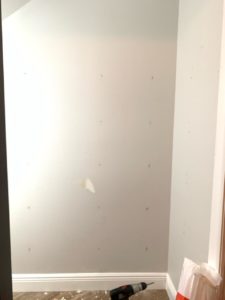
First thing to do: Remove everything from in the pantry. We put everything out across our dining room table – yes, it’s all still there now as I write this. Not having any planned guests or hosting of parties, the dining table served as a great place for everything because it was long enough for all the items to fit, AND was going to be annoying enough to motivate us to keep going with the project! After removing all the items, we then unscrewed all of the attachments, including the apron holders, and removed the shelving unit. (Incidentally, I have the shelves in my garage as they await their final destination in our garbage – unless someone else wants them! Let me know!). Next, we decided to go to Home Depot to get all of our materials – wood, screws with anchors, liquid nail, brackets, and drywall patching, so we measured all of the distances we needed and went to buy.
*Side Note: Home Depot has this wonderful service where they will actually cut your wood to size, then charge you for only the wood you actually use! It’s great because you can get yourself a custom made look with just a little planning, preparation and precision! We returned home to lay out our new purchases, and of course, realized we didn’t actually get all the wood we set out to get (in the massive cutting we were asking the gentleman to do, he neglected to give us all the wood we wanted and we didn’t catch it at the store, so we had to plan to go back the next day, although you certainly wouldn’t have to do this step).
Everything out!
In the meantime, using a putty knife, painter’s knife, or spackling knife, specifically I used the painter’s knife because if has sharp enough edges to scrape all the uneven surfaces and smooth out the field, so to speak. Some paint also came loose in this process, and it made the pantry actually look worse! Do not fear! Keep going! Then, with the compound I just bought, the the painter’s knife, I filled in the holes and flattened out the surface by scraping the excess. So that’s glob, fill, smush, scrape. Repeat as necessary.
*Additional Side note: My dad was notorious for not cleaning up after himself from any project. Here, I strongly advise you to not be like this, despite it being easier. You will have lots of chunks of dry wall, old paint, etc all over the floor, and your knife will have left over compound. Secret tip – in order to prolong the life of your knife, the uses of your knife and maintain a smooth finish, you must have a clean knife. If you allow the old compound to sit on, it will cause textures in your wall the next time you put on compound. Also, as for the floors, if you don’t clean now, then when you prep and paint, you will cause even more mess, and potentially track that mess into the rest of your home.
We figured all this was enough work for one day, so we cleaned and called it quits!
Continue Reading Here for Day 2!

